摘要訊息 : 在 CentOS 8 和 MySQL 8 下配置 Etherpad.
0. 前言
Etherpad 是一個基於網頁的線上文件協同運作軟體. 類似於 Google Docs, 它支援多個使用者同時在一個檔案上進行即時編輯, 還有一個聊天的功能. 今天, 我們在 CentOS 8 和 MySQL 8 下安裝配置 Etherpad.
更新紀錄 :
- 2022 年 6 月 14 日進行第一次更新和修正.
1. 安裝 Node.js
Etherpad 是基於 Node.js 的, 它不像 Seafile (基於 Python) 和 Nextcloud (基於 PHP). 而 Node.js 的安裝比 PHP 要簡單很多, 我們可以直接使用指令 : dnf install -y nodejs.
當然, 這樣安裝的 Node.js 並不是最新版本的. 如果我們希望安裝最新版本的 Node.js, 那麼跟隨下列操作. 首先進入 https://nodejs.org/en/, 我們發現最新的版本是 Node.js 18, 而使用
dnf指令安裝的 Node.js 的版本原沒有那麼高 (但其實並不需要那麼高). 因此, 我們首先更新 RPM 套件 :curl -fsSL https://rpm.nodesource.com/setup_16.x | sudo bash -. 然後就可以使用dnf指令進行安裝了 :dnf install -y nodejs. 我們可以使用node -v指令查看 Node.js 的版本.
2. 安裝 Etherpad
在安裝之前, 首先要確保 Git 已經安裝 : dnf install -y git. 我們進入網頁專用的檔案夾 /www : cd /www, 然後下載 Etherpad : git clone --branch master git://github.com/ether/etherpad-lite.git. 我個人習慣重新命名, 當然你也可以不這樣做 : mv etherpad-lite note.
接著我們創建一個專門用於 Etherpad 的作業系統使用者 : useradd etherpad. 然後設定密碼 : passwd etherpad. 接下來要輸入兩次 etherpad 使用者的密碼, 這個密碼由大家自己決定. 然後將使用者 etherpad 的根目錄設定為 /www/note : vim /etc/passwd, 然後按下 / 輸入 etherpad, 修改兩個數字之後的內容為 : etherpad:x:數字:數字:Etherpad:/www/note:/bin/bash. 這兩個數字是有關使用者的 ID, 不要修改它. 然後拷貝一些必要的檔案到 Etherpad 的檔案夾下 : cp ~/.bash_profile /www/note && cp ~/.bashrc /www/note. 之後我們將 Etherpad 檔案夾的權限給予 etherpad 使用者 : chown -R etherpad:etherpad /www/note.
最後我們直接從 root 使用者切換到 etherpad 使用者 : su etherpad (切換完成之後會自動來到 /www/note 檔案夾), 直接執行指令 : src/bin/run.sh. 等待指令執行完成. 當指令完成之後, Etherpad 就已經在運作了, 大概會是這樣的 :
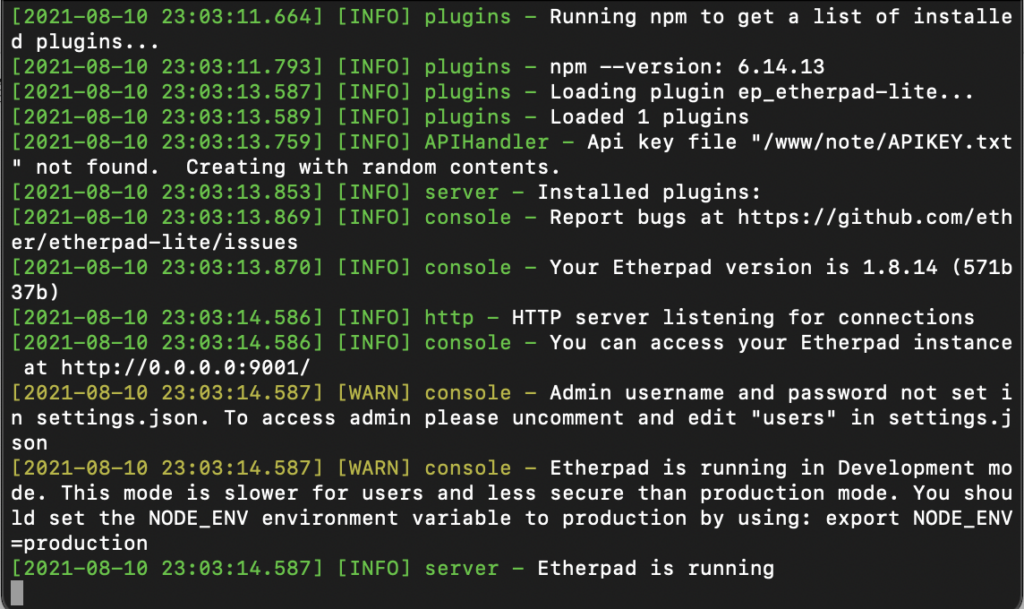
安裝完成之後, 我們可以直接在瀏覽器中訪問 http://伺服器 IP:9001/, 就可以看到 Etherpad 的界面了. 如果你無法看到這個界面的話, 可能需要修改防火牆的設定.
對於使用 firewalld 的伺服器, 我們直接通過
su指令或者exit指令切換回root使用者, 然後執行指令 :firewall-cmd --permanent --zone=public --add-port=9001/tcp && firewall-cmd --reload. 然後通過su etherpad切換到etherpad使用者, 再次執行指令src/bin/run.sh即可.如果你的伺服器使用的是 SELinux, 請自行開放
9001連接埠.如果伺服器提供商自建了防火牆, 那麼需要跟隨伺服器提供商的提示, 開放
9001連接埠, 模式為 TCP.
然後通過 su etherpad 切換到 etherpad 使用者, 再次執行指令 src/bin/run.sh 即可.

3. 配置 Etherpad
其實 Etherpad 在安裝之後不需要配置就可以使用, 但是為了提升使用體驗, 我們進行一些個性化配置. 如果閣下沒有興趣可以無需閱讀本節, 直接開始使用即可.
3.1 更改資料庫為 MySQL
預設情況下, Etherpad 使用檔案進行存儲. 而這種存儲方式遠不及 MySQL, 特別是在有大量筆記的情況下. 首先, 我們進入 MySQL 控制界面 : mysql -uroot -p, 然後輸入 MySQL 的 root 使用者的密碼. 然後創建一個新的用戶 : CREATE USER 'etherpad'@'localhost' IDENTIFIED BY '你的密碼';. 然後創建一個 Etherpad 專用的資料表 : CREATE DATABASE 'etherpad';. 然後把這個資料表的權限授予 MySQL 使用者 etherpad : GRANT ALL PRIVILEGES ON `etherpad`.* TO 'etherpad'@'localhost';. 就目前為止, 為 Etherpad 配置 MySQL 的準備工作已經完成. 之後, 我們直接通過修改配置檔案即可實現將 Etherpad 運作於 MySQL 之上. 具體可以查看第 3.4 節.
3.2 讓 Etherpad 作為作業系統服務
對於 Nginx, MySQL 和 PHP, 我們都有 systemctl start xxx 來直接啟用某個服務. 但是對於 Etherpad, 我們首先要切換到對應用戶, 然後才能啟動. 除此之外, 啟動之後, 我們這個終端機沒有辦法做其它事情. 當我們關閉終端機的時候, 服務會隨之終結. 因此, 我們自然希望像 Nginx 這些應用程式一樣可以後台作業.
我們輸入指令 : vim /etc/systemd/system/etherpad.service. 然後按下 i 進入編輯模式, 複製下面的程式碼, 然後按下 ESC 退出編輯模式, 輸入 wq! 退出檔案編輯 :
[Unit]
Description=Etherpad
After=syslog.target network.target

[Service]
Type=simple
User=etherpad
Group=etherpad
Environment=NODE_ENV=production
ExecStart=/www/note/src/bin/run.sh
Restart=always

[Install]
WantedBy=multi-user.target
重新載入系統服務 : systemctl daemon-reload. 最後我們嘗試開啟 : systemctl start etherpad. 如果要設定開機啟動, 那麼執行下面的指令 : systemctl enable etherpad. 啟動服務之後, 我們就可以直接訪問 Etherpad 的網址.
3.3 運作於 Nginx 之上
這裡直接給出一份帶有 SSL 的 Nginx 配置 :
server {
    listen       80;
    listen       [::]:80;
    server_name  你的網域名稱;
    rewrite ^(.*) https://$host$1 permanent;
}
server {
    listen       443 ssl http2;
    listen       [::]:443 ssl http2;
    server_name  你的網域名稱;
    access_log /var/log/nginx/etherpad.access.log main;
    error_log /var/log/nginx/etherpad.error.log error;
    ssl_certificate 證書存放位置;
    ssl_certificate_key 證書密鑰存放位置;
    ssl_session_timeout 5m;
    ssl_protocols TLSv1 TLSv1.1 TLSv1.2;
    ssl_prefer_server_ciphers on;
    ssl_ciphers 'ECDHE-ECDSA-AES256-GCM-SHA384:ECDHE-ECDSA-AES128-GCM-SHA256:ECDHE-RSA-AES256-GCM-SHA384:ECDHE-RSA-AES128-GCM-SHA256:ECDHE-ECDSA-AES256-SHA384:ECDHE-ECDSA-AES128-SHA256:ECDHE-RSA-AES256-SHA384:ECDHE-RSA-AES128-SHA256:ECDHE-RSA-AES256-SHA:ECDHE-ECDSA-AES256-SHA:ECDHE-RSA-AES128-SHA:ECDHE-ECDSA-AES128-SHA:DHE-RSA-AES256-GCM-SHA384:DHE-RSA-AES256-SHA256:DHE-RSA-AES256-SHA:DHE-RSA-CAMELLIA256-SHA:DHE-RSA-AES128-GCM-SHA256:DHE-RSA-AES128-SHA256:DHE-RSA-AES128-SHA:DHE-RSA-SEED-SHA:DHE-RSA-CAMELLIA128-SHA:HIGH:!aNULL:!eNULL:!LOW:!3DES:!MD5:!EXP:!PSK:!SRP:!DSS';
    add_header X-Content-Type-Options nosniff;
    add_header X-XSS-Protection "1; mode=block";
    add_header X-Robots-Tag none;
    add_header X-Download-Options noopen;
    add_header X-Permitted-Cross-Domain-Policies none;
    add_header Referrer-Policy no-referrer;
    add_header Strict-Transport-Security "max-age=31536000; includeSubDomains; preload" always;
    add_header X-Robots-Tag "none" always;
    location / {
        proxy_pass http://127.0.0.1:9001;
        proxy_buffering off;
        proxy_set_header Host $host;
        proxy_pass_header Server;
        proxy_set_header X-Real-IP $remote_addr;
        proxy_set_header X-Forwarded-For $remote_addr;
        proxy_set_header X-Forwarded-Proto $scheme;
        proxy_set_header Upgrade $http_upgrade;
        proxy_set_header Connection $connection_upgrade;
    }
}
map $http_upgrade $connection_upgrade {
    default upgrade;
    ''      close;
}
這裡要注意, 如果你更改了連接埠, 上面配置檔案中的連接埠也需要一同更改. 然後我們通過 nginx -t 指令來檢查配置檔案是否存在錯誤.
配置完成之後, 需要重新載入 Nginx 的配置檔案 : systemctl reload nginx. 然後就可以通過網域名稱來訪問 Etherpad.
3.4 其它配置
我們直接給出配置和選項的說明 :
{
  "title": "Jonny'Note",        // 網站標題
  "favicon": null,      // Favicon 地址, null 表示使用預設的 icon
  "skinName": "colibris",       // 網站樣板, 所有 src/static/skins 下的名稱都是可以填寫的. 使用傳統的網站樣板可以填寫 "no-skin"
  "skinVariants": "super-light-toolbar super-light-editor light-background",        // 網站樣板變數. ToolBar, 編輯器和背景都是可以指定的. 預設有四種 : super-light, light, dark 和 super-dark
  "ip": "0.0.0.0",      // IP
  "port": 9001,     // 連接埠
  "users": {
    "管理者帳戶": {
      "password": "密碼",
      "is_admin": true,     // 是否為管理者
      //"readOnly" : false,       // 是否對筆記僅可讀
      //"canCreate" : true        // 是否可以創建新的筆記
    }
  },
  "showSettingsInAdminPage": true,      // 在管理者頁面顯示設定
  /*"ssl" : {
            "key"  : "/path-to-your/epl-server.key",
            "cert" : "/path-to-your/epl-server.crt",
            "ca": ["/path-to-your/epl-intermediate-cert1.crt", "/path-to-your/epl-intermediate-cert2.crt"]
          },*/        //SSL 設定. 之後我們回讓 Etherpad 運作在 Nginx 上, 所以這裡不使用這個選項
  "dbType": "mysql",        // 資料庫類型, 可以使用任意支援的資料庫, 如 PostgreSQL, SQLite 和 MySQL 等. 如果使用檔案存儲, 則可以填寫 "dirty". 下面的 "dbSettings" 也要隨之更改
  "dbSettings" : {
    "user":     "資料庫使用者",
    "host":     "localhost",
    "port":     3306,
    "password": "使用者密碼",
    "database": "資料庫名稱",
    "charset":  "utf8mb4"
  },
  /*"dbType" : "dirty",
  "dbSettings": {
    "filename": "var/dirty.db"
  },*/      // 這是一份使用 "dirty" 的示例
  "defaultPadText" : "Welcome to Jonny'Note!\n\nThis pad text is synchronized as you type, so that everyone viewing this page sees the same text. This allows you to collaborate seamlessly on documents!",     // 預設文字
  "padOptions": {
    "noColors":         false,
    "showControls":     true,
    "showChat":         true,
    "showLineNumbers":  true,
    "useMonospaceFont": false,
    "userName":         true,
    "userColor":        true,
    "rtl":              true,
    "alwaysShowChat":   false,
    "chatAndUsers":     true,
    "lang":             "zh-TW"
  },        // 這裡是一些選項的配置, 包括聊天和一些需要顯示的選項
  "padShortcutEnabled" : {
    "altF9":     true, /* focus on the File Menu and/or editbar */
    "altC":      true, /* focus on the Chat window */
    "cmdShift2": true, /* shows a gritter popup showing a line author */
    "delete":    true,
    "return":    true,
    "esc":       true, /* in mozilla versions 14-19 avoid reconnecting pad */
    "cmdS":      true, /* save a revision */
    "tab":       true, /* indent */
    "cmdZ":      true, /* undo/redo */
    "cmdY":      true, /* redo */
    "cmdI":      true, /* italic */
    "cmdB":      true, /* bold */
    "cmdU":      true, /* underline */
    "cmd5":      true, /* strike through */
    "cmdShiftL": true, /* unordered list */
    "cmdShiftN": true, /* ordered list */
    "cmdShift1": true, /* ordered list */
    "cmdShiftC": true, /* clear authorship */
    "cmdH":      true, /* backspace */
    "ctrlHome":  true, /* scroll to top of pad */
    "pageUp":    true,
    "pageDown":  true
  },        // 一些快捷指令
  "suppressErrorsInPadText": false,     // 是否強制不顯示錯誤
  "requireSession": false,      // Session 設定
  "editOnly": false,        // 僅編輯而不能創建新的筆記
  "minify": true,       // CSS 和 JavaScript 優化
  "maxAge": 21600, // 最大通信時長, 單位 : 秒
  "abiword": null,      // Abiword 設定
  "soffice": null,      // 在線 Office 設定
  "tidyHtml": null,     // Tidy HTML 設定
  "allowUnknownFileEnds": true,     // 允許未知後綴的檔案匯入
  "requireAuthentication": true,        // 網站登錄需要驗證
  "requireAuthorization": true,        // 管理者頁面需要登錄
  "trustProxy": true,       // 我們使用 Nginx, 因此設為 true
  "cookie": {
    "sameSite": "Lax"
  },        // Cookie 設定
  "disableIPlogging": true,        // 是否關閉 IP 登錄
  "automaticReconnectionTimeout": 0,        // 重新連接時間. 0 為自動重新連接
  "scrollWhenFocusLineIsOutOfViewport": {
    "percentage": {
      "editionAboveViewport": 0,
      "editionBelowViewport": 0
    },      // 滑鼠滾動設定
    "duration": 0,      // 使用動畫滾動過度的時間. 單位 : 毫秒
    "scrollWhenCaretIsInTheLastLineOfViewport": false,      // 向最後一行插入時, 是否滾動
    "percentageToScrollWhenUserPressesArrowUp": 0       // 當使用者在視口頂部的行中按下向上箭頭時, 要額外滾動的視口高度的百分比
  },
  "socketTransportProtocols" : ["xhr-polling", "jsonp-polling", "htmlfile"],
  "socketIo": {
    "maxHttpBufferSize": 10000
  },        // Socket 配置
  "loadTest": false,        // 允許載入僅供測試的工具
  "dumpOnUncleanExit": false,       // 禁用物件轉儲
  "indentationOnNewLine": true,        // 上一行使用 ':, [, (, {' 作為結束字元時, 下一行開啟縮進
  "importExportRateLimiting": {
    "windowMs": 90000,
    "max": 10
  },        // 載入筆記設定
  "importMaxFileSize": 52428800,        // 最大上傳檔案大小. 單位 : KB
  "commitRateLimiting": {
    "duration": 1,
    "points": 10
  },        // 提交比率設定
  "toolbar": {
    "left": [
      ["bold", "italic", "underline", "strikethrough"],
      ["orderedlist", "unorderedlist", "indent", "outdent"],
      ["undo", "redo"],
      ["clearauthorship"]
    ],
    "right": [
      ["importexport", "timeslider", "savedrevision"],
      ["settings", "embed"],
      ["showusers"]
    ],
    "timeslider": [
      ["timeslider_export", "timeslider_returnToPad"]
    ]
  },        // 工具欄位配置
  "exposeVersion": false,       // 是否暴露版本
  "loglevel": "INFO",       // 日誌級別
  "logconfig" :
    { "appenders": [
        { "type": "console"
        //, "category": "access"// only logs pad access
        }

      /*
      , { "type": "file"
      , "filename": "your-log-file-here.log"
      , "maxLogSize": 1024
      , "backups": 3 // how many log files there're gonna be at max
      //, "category": "test" // only log a specific category
        }
      */

      /*
      , { "type": "logLevelFilter"
        , "level": "warn" // filters out all log messages that have a lower level than "error"
        , "appender":
          {  Use whatever appender you want here  }
        }
      */

      /*
      , { "type": "logLevelFilter"
        , "level": "error" // filters out all log messages that have a lower level than "error"
        , "appender":
          { "type": "smtp"
          , "subject": "An error occurred in your EPL instance!"
          , "recipients": "bar@blurdybloop.com, baz@blurdybloop.com"
          , "sendInterval": 300 // 60 * 5 = 5 minutes -- will buffer log messages; set to 0 to send a mail for every message
          , "transport": "SMTP", "SMTP": { // see https://github.com/andris9/Nodemailer#possible-transport-methods
              "host": "smtp.example.com", "port": 465,
              "secureConnection": true,
              "auth": {
                  "user": "foo@example.com",
                  "pass": "bar_foo"
              }
            }
          }
        }
      */

      ]
    },      // 日誌設定
  "customLocaleStrings": {},        // 自訂設定
  "enableAdminUITests": true       // 開啟管理者 UI 測試
}
上面使用中文標識的是大家需要修改的地方. 如果大家對於如何配置有了解, 並且有能力獨立配置, 那麼可以修改其它選項. 否則, 我不建議大家修改.
如果要增加使用者, 只需要在選項 "users" 下按照第一個使用者增加配置即可. 如果大家不要求登錄, 可以將 "requireAuthentication" 設定為 false.
另外, 如果大家需要在管理者控制台下載外掛, 那麼需要仔細閱讀外掛的說明, 有些需要在 settings.json 下添加一些東西.
自創文章, 原著 : Jonny. 如若閣下需要轉發, 在已經授權的情況下請註明本文出處 :


真的是一篇很詳細的好文章,受益匪淺。讓向我這樣小白節省了很多的時間。
感谢!