摘要訊息 : 在 CentOS 8, Nginx 和 MySQL 8 下配置 Seafile 專業版.
0. 前言
三年前, 我寫下了關於 Seafile 的兩篇文章文章《在 CentOS 7 下安装 Seafile 社区版》和《CentOS 7 与 MySQL 5.7 下搭建 Seafile 企业版》. 直到今天的 Jonny'Blog 訪問量中, 這幾篇關於私有雲的文章仍然佔有一些點擊率, 儘管它們已經不是最新的文章了. 在 CentOS 8 和 MySQL 8 已經發布的情況下, 我覺得有必要對文章進行更新.
Seafile 專業版是面向個人、小型團隊和家庭的私有雲, 三個人以下的使用是免費的, 如果多於三個人使用則需要付費. 由於專業版的從功能上來說要比社區版要多太多, 同時社區版的安裝配置也比專業版要簡單, 因此社區版的我不再另外撰寫教學.
更新紀錄 :
- 2022 年 5 月 31 日進行第一次更新和修正.
1. 下載
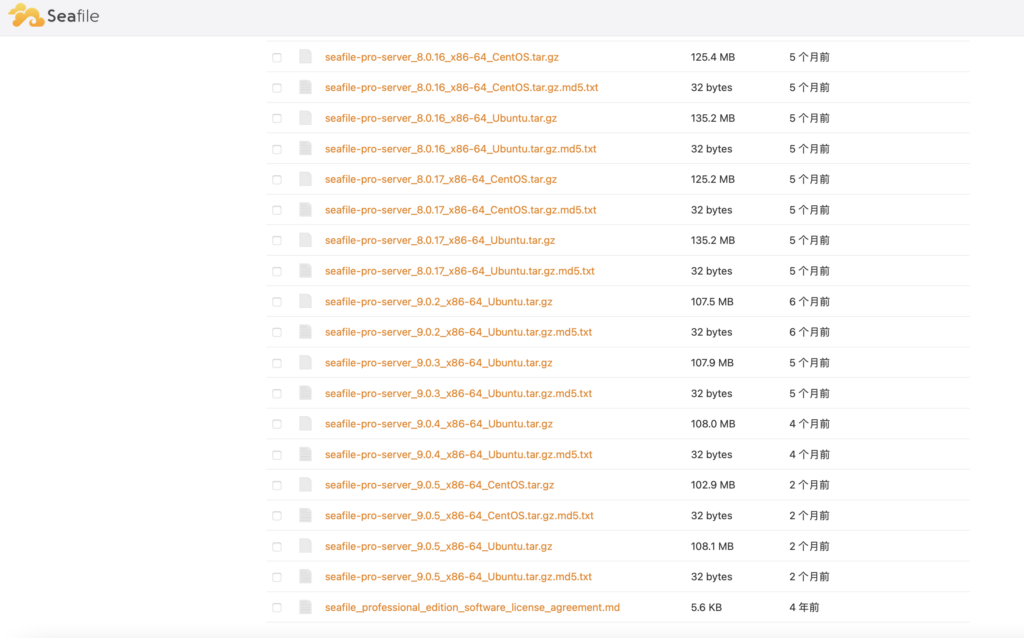
我們首先進入英文版的 Seafile 下載網站 https://www.seafile.com/en/download/, 中文版是找不到專業版這個版本的. 然後把頁面拉到最下面找到 Server Professional Edition, 再找到並且點擊 customer center. 如果你沒有帳號, 那麼需要註冊一個賬號. 註冊完畢或者已經持有帳號的話, 直接登陸就可以了. 登陸完畢之後點擊最左側的 Downloads, 然後右側有一個藍色的下載鏈接 https://download.seafile.com/d/你自己的編號/?p=/pro. 中間的編號每個人都是不一樣的, 這個和社區版的下載是不同的. 進入這個網頁之後, 我們可以看到 Seafile 的演示版本, 拉到最下面就可以看到最新的版本. 要注意我們下載的版本後綴是 _CentOS.tar.gz, 不是 .txt 結尾, 也不帶有 _Ubuntu 字樣. 直接點擊下載是下載到電腦上, 現在我們要下載到伺服器上, 所以可以停止下載, 複製下載連結即可. 然後在伺服器中為 Seafile 建立一個專門的檔案夾 : mkdir -p /www/seafile && cd /www/seafile. 最後通過 wget 指令 wget 下載連結, 即可把 Seafile 下載到伺服器中.
從 Seafile 7.1 開始, Seafile 已經更改使用 Python 3 了, 因此依賴的套件會有些不同. 這裡要特別注意, Seafile 建議伺服器的記憶體至少有 2GB 的大小.
2. 安裝
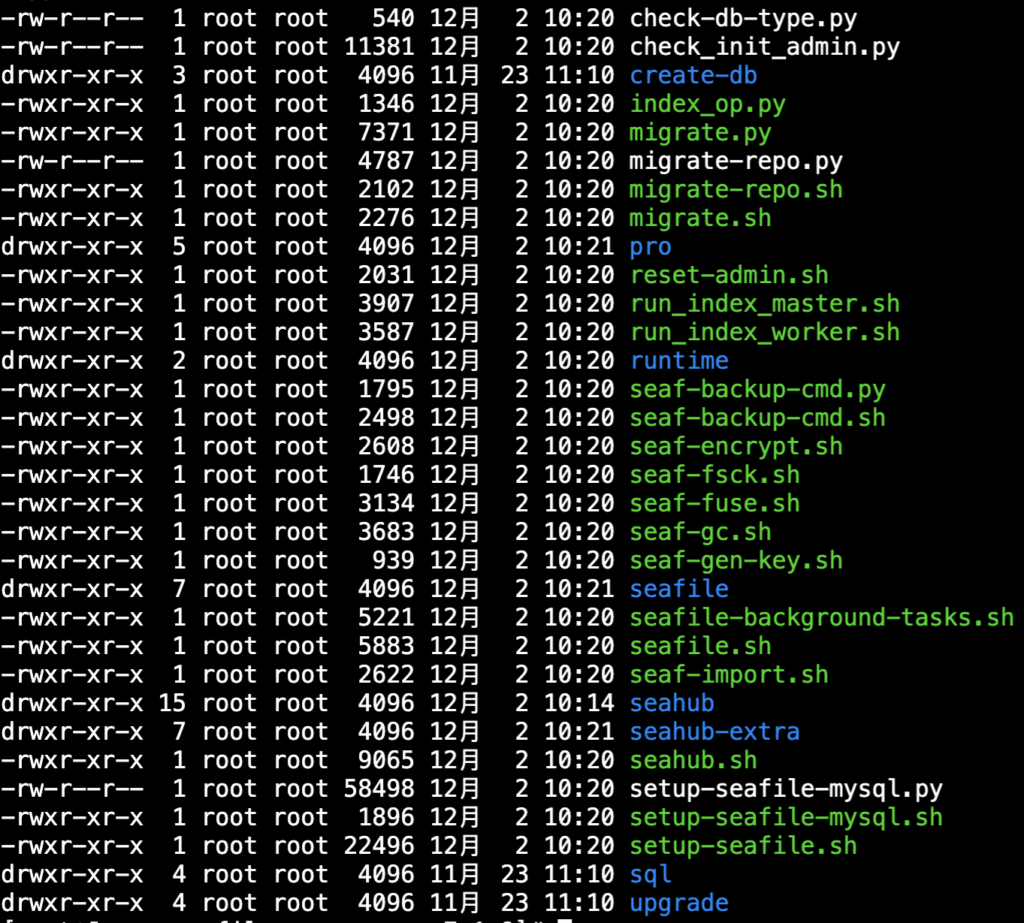
下載完畢之後, 我們首先需要解壓縮 : tar -zxvf seafile-pro-server*.tar.gz. 解壓縮之後, 我們得到了 seafile-pro-server-版本號 這個檔案夾, 進入這個檔案夾 cd seafile-pro-server*. 使用 ll 指令可以看到 Seafile 檔案夾的基本架構 :
我們需要安裝 Seafile 依賴的套件 : dnf install -y python3 python3-setuptools python3-pip poppler-utils java-1.8.0-openjdk mysql-devel gcc. 除此之外, 還要安裝 Python 套件 : pip3 install Pillow pylibmc captcha jinja2 sqlalchemy django-pylibmc django-simple-captcha python3-ldap boto mysqlclient. 然後就可以運作安裝程式了 : ./setup-seafile-mysql.sh.
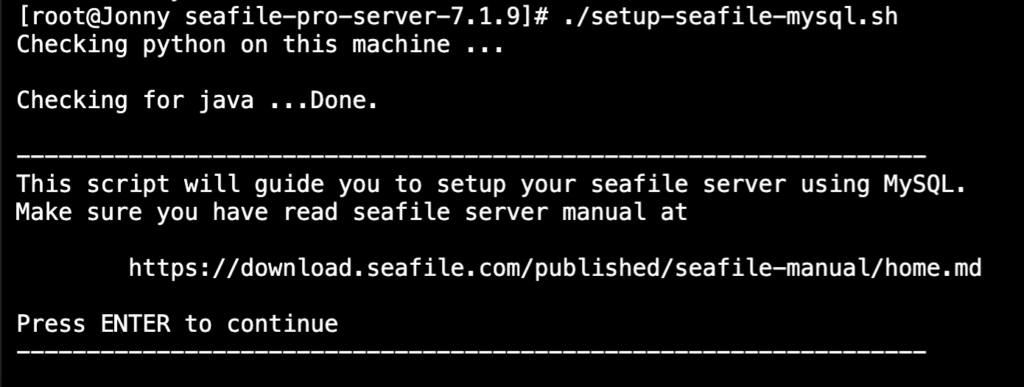
這個指令碼首先會檢查所有依賴的套件是否已經安裝, 如果沒有問題, 那麼就會出現上述界面. 如果沒有問題, 直接按回車鍵進入安裝流程 :
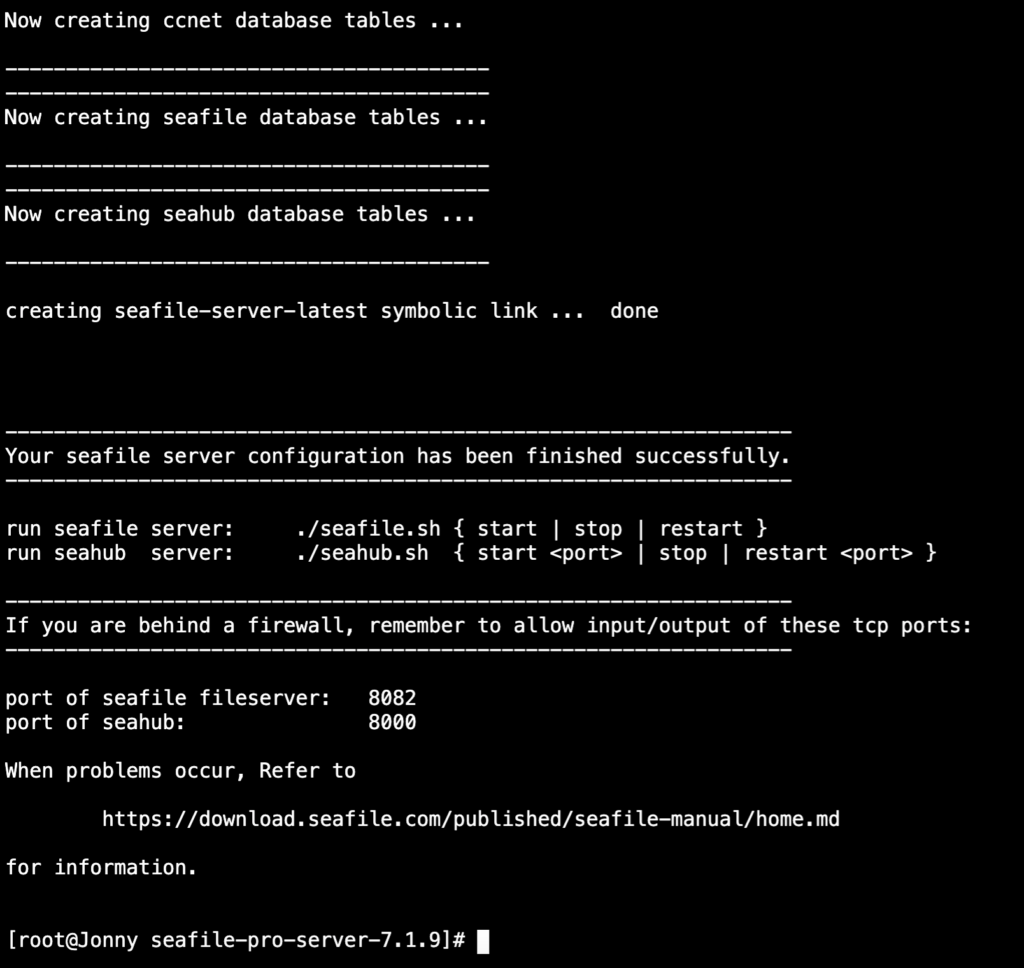
server name: 填寫伺服器名稱;This server's ip or domain: 填寫伺服器的網域名稱或者 IP;Which port do you want to use for the seafile fileserver?: 預設 Seafile 檔案伺服器連接埠是8082, 沒有衝突不建議更改;Please choose a way to initialize seafile databases?: 有兩種方式, 第一種是由安裝程式來創建資料庫, 第二種是手動填寫資料庫信息. 如果閣下是第一次安裝請選1, 如果有自訂要求可以選2;What is the host of mysql server?: 這裡填寫 MySQL 的伺服器, 如果安裝在了伺服器本機上, 可以直接回車確認, 否則需要自行確認 MySQL 伺服器;What is the port of mysql server?: 這個問題是詢問 MySQL 的連接埠, 預設為3306. 有更改的話填寫更改之後的連接埠;What is the password of the mysql root user?: 這是詢問最高權限使用者root的密碼;Enter the name for mysql user of seafile: 這是安裝程式正在為 Seafile 創建資料庫帳戶, 有需要的話自訂, 沒有的話按回車確認;Enter the password for mysql user "seafile": 這是為資料庫seafile設定密碼, 安全起見不建議和root使用者相同 (密碼中不要包含%字元, 這會導致錯誤);Enter the database name for ccnet-server/seahub-db/seafile-db: 這三個問題是詢問和 Seafile 有關的資料庫的名稱是否需要自訂, 一般直接回車確認即可, 我們也沒有必要進行修改.
接下來, 我們在 Nginx 下啟用 Seafile. 首先需要創建 Seafile 的配置文件 vim /etc/nginx/conf.d/seafile.conf, 將以下內容修改之後複製到這個配置檔案中 :
server {
    listen 80;
    server_name 你的網域名稱;
    rewrite ^ https://$http_host$request_uri? permanent;
    server_tokens off;
}
server {
    listen 443 ssl http2;
    server_name 你的網域名稱;
    ssl_certificate 網域名稱對應的 SSL .crt 證書所在位置;
    ssl_certificate_key 網域名稱對應的 SSL .key 證書所在位置;
    ssl_session_timeout 5m;
    ssl_session_cache shared:SSL:5m;
    ssl_protocols TLSv1 TLSv1.1 TLSv1.2;
    ssl_ciphers 'ECDHE-ECDSA-AES256-GCM-SHA384:ECDHE-ECDSA-AES128-GCM-SHA256:ECDHE-RSA-AES256-GCM-SHA384:ECDHE-RSA-AES128-GCM-SHA256:ECDHE-ECDSA-AES256-SHA384:ECDHE-ECDSA-AES128-SHA256:ECDHE-RSA-AES256-SHA384:ECDHE-RSA-AES128-SHA256:ECDHE-RSA-AES256-SHA:ECDHE-ECDSA-AES256-SHA:ECDHE-RSA-AES128-SHA:ECDHE-ECDSA-AES128-SHA:DHE-RSA-AES256-GCM-SHA384:DHE-RSA-AES256-SHA256:DHE-RSA-AES256-SHA:DHE-RSA-CAMELLIA256-SHA:DHE-RSA-AES128-GCM-SHA256:DHE-RSA-AES128-SHA256:DHE-RSA-AES128-SHA:DHE-RSA-SEED-SHA:DHE-RSA-CAMELLIA128-SHA:HIGH:!aNULL:!eNULL:!LOW:!3DES:!MD5:!EXP:!PSK:!SRP:!DSS';
    ssl_prefer_server_ciphers on;
    add_header Strict-Transport-Security "max-age=31536000; includeSubDomains; preload" always;
    proxy_set_header X-Forwarded-For $remote_addr;
    location / {
        proxy_pass http://127.0.0.1:8000;
        proxy_set_header Host $host;
        proxy_set_header X-Real-IP $remote_addr;
        proxy_set_header X-Forwarded-For $proxy_add_x_forwarded_for;
        proxy_set_header X-Forwarded-Host $server_name;
        proxy_set_header X-Forwarded-Proto https;
        proxy_read_timeout 1200s;
        client_max_body_size 0;
        access_log /var/log/nginx/seahub.access.log;
        error_log /var/log/nginx/seahub.error.log;
    }
    location /seafhttp {
        rewrite ^/seafhttp(.*)$ $1 break;
        proxy_pass http://127.0.0.1:8082;
        proxy_set_header X-Forwarded-For $proxy_add_x_forwarded_for;
        client_max_body_size 0;
        proxy_connect_timeout 36000s;
        proxy_read_timeout 36000s;
        proxy_send_timeout  36000s;
        send_timeout  36000s;
        proxy_request_buffering off;
    }
    location /media {
        root /Seafile 所在檔案夾/seafile-server-latest/seahub;
    }
}
請注意, 上述配置預設開啟了 SSL, 本網誌將棄用不使用 SSL 的連線方式. 對於 SSL 開啟的具體教學, 參考文章《Nginx 下实现 HTTPS》. 接下來使用 nginx -t 指令測試一下是否存在問題. 如果顯示有錯誤, 你需要根據 Nginx 給出的提示進行修改. 完成之後重新載入 Nginx 的配置檔案 : systemctl reload nginx.
在進行接下來的配置之前, 我們首先啟動 Seafile 來試一下. 回到 Seafile 所在檔案夾 : cd /www/seafile/seafile-pro-server*. 輸入 ./seafile.sh start && ./seahub.sh start 來啟動 Seafile. 在第一次啟動 Seahub 的時候, 會讓你創建一個管理員帳戶, 根據提示輸入郵箱、密碼和確認密碼即可. 如果出現
注意檢查一些 Nginx 配置中的 root /Seafile 所在檔案夾/seafile-server-latest/seahub; 這個檔案夾是否正確.
3. 配置
Seafile 的預設配置部分服務是沒有開啟的, 我們通過手動配置開啟這些服務以獲得更好的使用體驗.
3.1 開機啟動
創建 Seafile 服務檔案 : vim /etc/systemd/system/seafile.service, 將下列內容修改後複製入檔案中 :
[Unit]
Description=Seafile
After=network.target

[Service]
Type=oneshot
ExecStart=/Seafile 所在檔案夾/seafile-server-latest/seafile.sh start
ExecStop=/Seafile 所在檔案夾/seafile-server-latest/seafile.sh stop
RemainAfterExit=yes
User=seafile
Group=seafile

[Install]
WantedBy=multi-user.target
創建 Seahub 服務檔案 : vim /etc/systemd/system/seahub.service, 將下列內容修改後複製入檔案中 :
[Unit]
Description=Seafile hub
After=network.target seafile.service

[Service]
ExecStart=/Seafile 所在檔案夾/seafile-server-latest/seahub.sh start
ExecStop=/Seafile 所在檔案夾/seafile-server-latest/seahub.sh stop
User=seafile
Group=seafile
Type=oneshot
RemainAfterExit=yes

[Install]
WantedBy=multi-user.target
重新載入 systemd 設定檔 : systemctl daemon-reload. 然後就可以使用 systemd 指令啟動 Seafile 和設定開機啟動了 :
# 啟動
systemctl start seafile
systemctl start seahub

# 停止
systemctl stop seafile
systemctl stop seahub

# 開機啟動
systemctl enable seafile
systemctl enable seahub

# 取消開機啟動
systemctl disable seafile
systemctl disable seahub
3.2 設定 logrotate
這個功能允許你在剪切日誌檔案的時候無需關閉 Seafile : vim /etc/logrotate.d/seafile, 將下列內容修改後複製入檔案即可 :
/opt/seafile/logs/seafile.log
{
        daily
        missingok
        rotate 15
        compress
        delaycompress
        notifempty
        sharedscripts
        postrotate
                [ ! -f /home/haiwen/pids/seaf-server.pid ] || kill -USR1 `cat /Seafile 所在檔案夾/pids/seaf-server.pid`
        endscript
}

/opt/seafile/logs/ccnet.log
{
        daily
        missingok
        rotate 15
        compress
        delaycompress
        notifempty
        sharedscripts
        postrotate
                [ ! -f /home/haiwen/pids/ccnet.pid ] || kill -USR1 `cat /Seafile 所在檔案夾/pids/ccnet.pid`
        endscript
}

/opt/seafile/logs/index.log
{
        daily
        missingok
        rotate 15
        compress
        delaycompress
        notifempty
        sharedscripts
}
3.3 配置 Memcached
Memcached 在多人使用的情況下 (特別是超過 50 人的情況下), 可以提高效能. 首先安裝依賴的套件並且啟動服務 :
dnf install -y memcached libmemcached
pip3 install pylibmc django-pylibmc
systemctl enable --now memcached
然後將以下內容加入到 /Seafile 所在檔案夾/conf/seahub_settings.py 的最後 :
CACHES = {
    'default': {
        'BACKEND': 'django_pylibmc.memcached.PyLibMCCache',
        'LOCATION': '127.0.0.1:11211',
    },
    'locmem': {
        'BACKEND': 'django.core.cache.backends.locmem.LocMemCache',
    },
}
COMPRESS_CACHE_BACKEND = 'locmem'
3.4 全文搜尋
Seafile 7 以上的版本中, 全文搜尋和 PDF 與 Office 搜尋預設是開啟的, 不需要配置.
3.5 斷點傳續
把 ENABLE_RESUMABLE_FILEUPLOAD = True 添加到 /Seafile 所在檔案夾/conf/seahub_settings.py 中即可開啟斷點傳續.
3.6 用戶角色和管理員角色設定
下面是普通用戶角色的設定說明 :
| 變數 | 功能說明 |
can_add_repo | 允許創建資料庫 |
can_add_group | 允許創建群組 |
can_view_org | 允許閱覽組織 |
can_add_public_repo | 允許創建全員可見的公共資料庫 |
can_use_global_address_book | 允許使用全域通訊錄 (比如共享時能搜索到其他的用戶) |
can_use_wiki | 允許使用維基百科 |
can_publish_repo | 允許公開發佈資料庫 |
can_generate_share_link | 允許創建共享外鏈 |
can_generate_upload_link | 允許創建上載外鏈 |
can_invite_guest | 允許邀請訪客, 訪客不能擁有自己的文件 |
can_connect_with_android_clients | 允許使用安卓客戶端登錄 |
can_connect_with_ios_clients | 允許使用 iOS 客戶端登錄 |
can_connect_with_desktop_clients | 允許使用桌面客戶端登錄 |
要添加一個新的角色, 只需要把以下內容按照你的要求作修改, 然後添加到 /Seafile 所在檔案夾/conf/seahub_settings.py 中即可 :
ENABLED_ROLE_PERMISSIONS = {
    '角色名稱': {
        'can_add_repo': True,
        'can_add_group': True,
        'can_view_org': True,
        'can_add_public_repo': True,
        'can_use_global_address_book': True,
        'can_use_wiki': True,
        'can_publish_repo': True,
        'can_generate_share_link': True,
        'can_generate_upload_link': True,
        'can_invite_guest': True,
        'can_connect_with_android_clients': True,
        'can_connect_with_ios_clients': True,
        'can_connect_with_desktop_clients': True,
    },
}
Seafile 內建了四種管理員角色 :
default_admin: 擁有所有權限;system_admin: 只能查看系統信息和系統配置;daily_admin: 只能查看系統信息, 統計信息, 用戶日誌以及管理資料庫/用戶/群組;audit_admin: 只能查看系統信息和管理員日誌.
其對應的設定為
ENABLED_ADMIN_ROLE_PERMISSIONS = {
    'system_admin': {
        'can_view_system_info': True,
        'can_config_system': True,
    },
    'daily_admin': {
        'can_view_system_info': True,
        'can_view_statistic': True,
        'can_manage_library': True,
        'can_manage_user': True,
        'can_manage_group': True,
        'can_view_user_log': True,
    },
    'audit_admin': {
        'can_view_system_info': True,
        'can_view_admin_log': True,
    },
    'custom_admin': {
        'can_view_system_info': True,
        'can_config_system': True,
        'can_view_statistic': True,
        'can_manage_library': True,
        'can_manage_user': True,
        'can_manage_group': True,
        'can_view_user_log': True,
        'can_view_admin_log': True,
    },
}
可以看到, 上面不管是關於用戶還是關於管理員的設定全是 True, 如果你需要關閉某些功能, 把 True 改為 False 即可.
3.7 多機構支援
Seafile 支援添加機構, 每個機構下都可以有管理員. 我們需要在 /Seafile 所在檔案夾/conf/seahub_settings.py 中添加下列程式碼 :
MULTI_INSTITUTION = True
EXTRA_MIDDLEWARE_CLASSES = (
    'seahub.institutions.middleware.InstitutionMiddleware',
)
3.8 病毒掃描
Tip : 個人使用的話, 不建議配置病毒掃描. 會導致伺服器極其緩慢, 而且會佔用大量的資源. 況且你自己也不會故意上傳一些病毒.
首先安裝依賴套件 dnf install -y clamav-server clamav-data clamav-filesystem clamav-lib clamav-update clamav clamav-devel, 配置 Freshclam 以支援定期更新病毒資料庫 : cp /etc/freshclam.conf /etc/freshclam.conf.bak && sed -i '/^Example/d' /etc/freshclam.conf. 令其可以開機啟動 : vim /usr/lib/systemd/system/clam-freshclam.service, 並且把下面內容修改後複製進去 :
[Unit]
Description = freshclam scanner
After = network.target

[Service]
Type = forking
ExecStart = /usr/bin/freshclam -d -c 4
Restart = on-failure
PrivateTmp = true

[Install]
WantedBy=multi-user.target
設定開機啟動 : systemctl enable --now clam-freshclam. 接下來配置 Clamd : cp /usr/share/doc/clamd/clamd.conf /etc/clamd.conf && sed -i '/^Example/d' /etc/clamd.conf && vim /clamd.conf. 搜尋 User, 把後面的 <USER> 修改為 root. 搜尋 LocalSocket, 去掉最前面的 "#", 然後把後面修改為 /var/run/clamd.sock. 接下來我們要啟動 clamd 服務, 必須進行配置 vim /etc/init.d/clamd, 加入下列內容 :
case "$1" in
  start)
    echo -n "Starting Clam AntiVirus Daemon... "
    /usr/sbin/clamd
    RETVAL=$?
    echo
    [ $RETVAL -eq 0 ] && touch /var/lock/subsys/clamd
    ;;
  stop)
    echo -n "Stopping Clam AntiVirus Daemon... "
    pkill clamd
    rm -f /var/run/clamav/clamd.sock
    rm -f /var/run/clamav/clamd.pid
    RETVAL=$?
    echo
    [ $RETVAL -eq 0 ] && rm -f /var/lock/subsys/clamd
    ;;
esac
執行指令 chmod +x /etc/init.d/clamd && service clamd on. 然後我們利用指令 clamdscan /你要掃描的檔案夾 測試一下病毒掃描. 最後, 我們在配置檔案 /Seafile 所在檔案夾/conf/seafile.conf 中, 將一下內容加入最後即可 :
[virus_scan]
scan_command = clamscan
virus_code = 1
nonvirus_code = 0
scan_interval = 60
scan_size_limit = 8192
scan_skip_ext = .bmp, .gif, .ico, .png, .jpg, .mp3, .mp4, .wav, .avi, .rmvb, .mkv
threads = 2
其中, scan_interval 是掃描間隔, 單位是分鐘. scan_size_limit 是掃描檔案的最大大小, 單位為 MB. scan_skip_ext 是後綴已經列出的檔案直接跳過掃描, 以 , 隔開. threads 是掃描的執行緒最大數量. 上面配置可以自訂.
3.9 LibreOffice 支援
LibreOffice 是對 Office 檔案的在線協作和預覽的工具. LibreOffice 我們採用手動安裝. 首先進入 https://www.libreoffice.org/download/download/?type=rpm-x86_64&lang=lt 查看最新版本的下載地址, 選擇之後記得選擇 RPM 檔案夾, 接下來還需要選擇 x86_64 檔案夾. 截止發文為止, 最新的版本下載地址為 https://www.libreoffice.org/donate/dl/rpm-x86_64/7.3.3/lt/LibreOffice_7.3.3_Linux_x86-64_rpm.tar.gz. 首先進入 Seafile 檔案夾中 cd /www/seafile, 然後下載 wget https://www.libreoffice.org/donate/dl/rpm-x86_64/7.3.3/lt/LibreOffice_7.3.3_Linux_x86-64_rpm.tar.gz. 解壓縮 tar -zxvf LibreOffice_7.0.3_Linux_x86-64_rpm.tar.gz 並且進入檔案夾 cd LibreOffice_7.0.3.1_Linux_x86-64_rpm/RPMS. 然後直接手動安裝套件 dnf localinstall -y *.rpm. 對於中文, 需要安裝一些字體 dnf install -y install wqy-microhei-fonts wqy-zenhei-fonts wqy-unibit-fonts.
接下來讓 Seafile 支援 LibreOffice. 在 /Seafile 所在檔案夾/conf/seafevents.conf 配置檔案的最後增加
[OFFICE CONVERTER]
enabled = true
workers = 1
outputdir = /tmp/
其中, workers 是同作處理的數量, outputdir 是 Office 及 PDF 檔案轉換後臨時存放的位置.
3.10 其它一些設定
Seafile 版本不斷在更新, 部分功能已經不需要手動配置了, 所以其它一些設定可以參考文章《Seafile 进阶玩法》. 需要提醒大家的是, 每一次修改任何屬於 Seafile 的設定檔之後, 如果需要設定生效, 就必須重新啟動 Seafile 或者 Seahub 服務. 當然, 也可以在配置過程中不重啟, 在所有配置都完成之後才重啟.
自創文章, 原著 : Jonny. 如若閣下需要轉發, 在已經授權的情況下請註明本文出處 :